
For those who know me, you've seen this egg a few times. I love it so. For this challenge I have chosen the theme EGG, so it gets to come out and show itself again. I did come across the original mold for it laying in a box and the trick for me will be to see if I can find which box. If I do, I'll make another egg for this challenge, and I may do a little painting. The muse will dictate what transpires.
I am inviting you to come and play in this challenge. Are you IN? Leave me a comment at the bottom of this post, and I'll start a players list. I'd love for you to make an egg, decorate an egg, photograph an egg, sculpt an egg, make something with egg in it (and show us,) ask your hen to lay an egg, draw one, paint one...well you get the idea. Do your post this weekend on your blog, and as you will be linked here, everyone will be able to be directed to you! It's easy.
Thanks for coming by; see you soon I hope, hugs, Norma, x
P.S. Everyone is welcome to join in the challenges.
The PLAYERS:
Carole,
Sus,
Ariane,
Patrice,
Petra,
Tania,
Stefanie,
Celine,
Kristen,
Ram,
Renilde,
BarbaraBee,
Emily,
Nadine,
Mano,
Sabine,
Justine,
Cindi
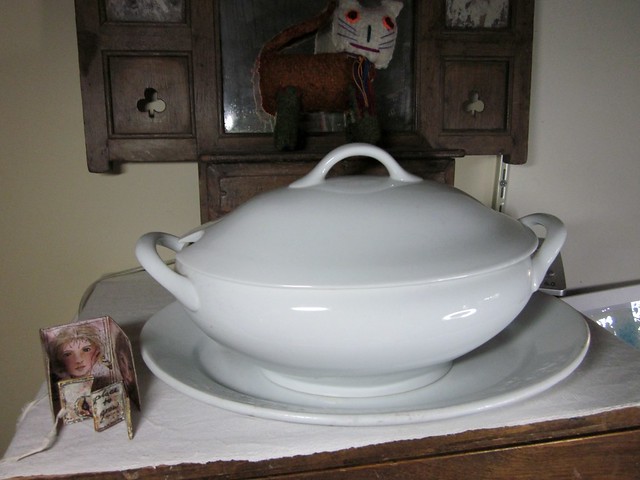
For this challenge, I had planned to do a new papier mache egg. I have a finished egg, years old now, and a partially finished egg [oh where is it I wonder] and the original plaster mold that I made. Trouble is, I can't find the mold, or the partially finished egg, or even the finished egg, come to it. So...there is nothing to do but make a brand new plaster mold. Let's begin. What is in the white ironstone soup tureen on my highboy?
Eggs! From a thrift store find a long time ago. They are still in the bag unopened. Time to open the bags. Here we have:
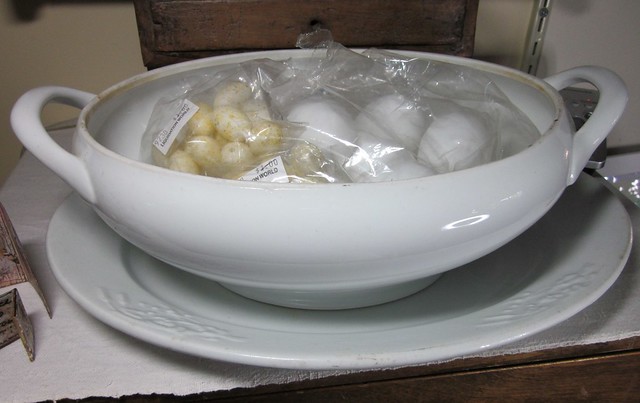
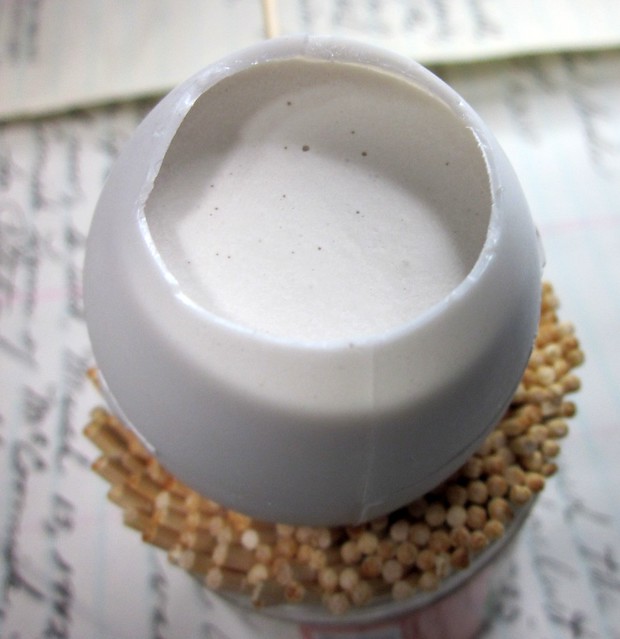
A small plastic egg and a larger egg the size one might find in the grocery store. I am going to make a plaster of paris mold from the smaller size egg. I needed a container to hold the wet plaster [continue reading] so I sliced open the larger egg. I will need to stabilize the larger egg, now called the container, so am using a stash of toothpicks. Perfect. So far!

I will need to hold the smaller egg stationary inside the larger container so have poked a hole at the side of the container. I poked a toothpick through the outside of the container and pushed it inside the container and then through a small hole in the small egg shape. This will hold the smaller egg shape in position. I've coated the inside of the container, and the outside of the small egg shape with a thin coat of vaseline to act as a 'release' agent. I have a dedicated vaseline brush for this purpose. The container has been set in place on the bed of toothpicks. The scene is set:
Time to pour the wet plaster. I use dental plaster with a ratio of about twice as much plaster as there is water. Add plaster to water; NOT water to plaster. Just keep dropping bits of plaster into the water, and stirring, until you get something the texture of runny jello. If you get to the toothpaste texture, it is too thick and won't pour. Add water drop by drop quickly, until you get it runny. Work fairly quickly as the dental plaster sets up real fast. It also gets warm and even hot, so take care. The most important stage of this whole process is ahead of you. Your goal is to pour in the wet plaster so that it covers the bottom
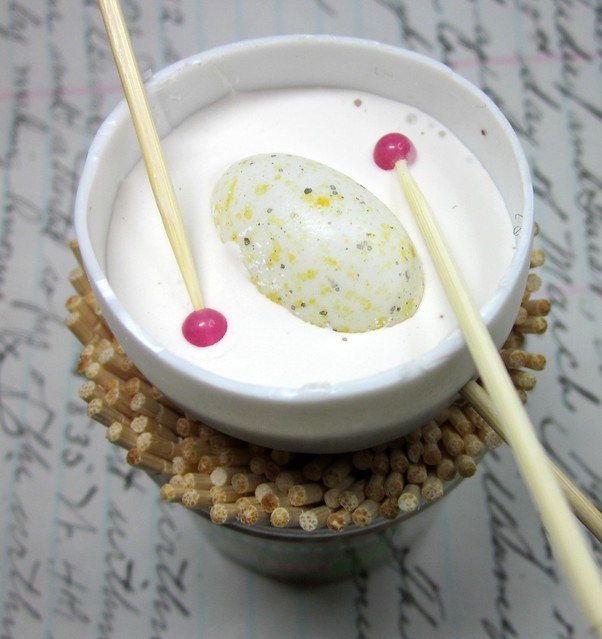
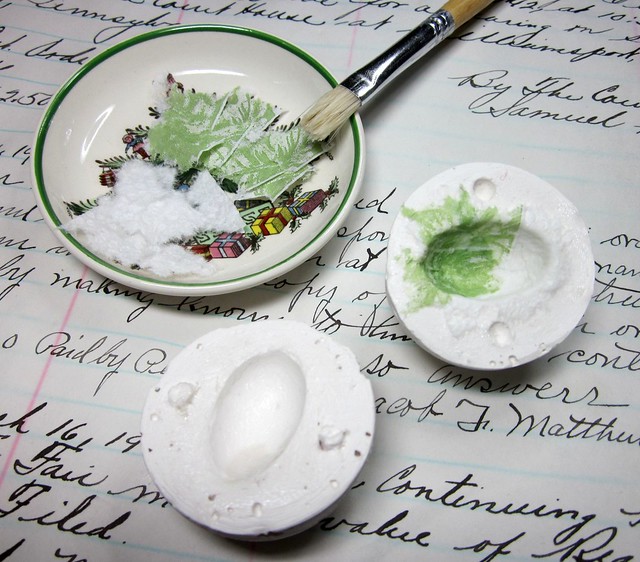
HALF of the small egg shape. So just pour it into the container and watch so that when the level reaches what looks like half of the small egg shape, stop pouring. If you've poured too much, quickly scoop out some plaster [but it has already started to harden up so work quickly if you have to do this.] Also, try not to pour directly on top of the little egg shape, or to splash wet plaster on it. The reason is, is that you want the surface of the little egg shape to be virgin. Here, the first half of the plaster has been poured. Note that I use two little balls (in this case, a bead that has been stuck with a toothpick in order to be easily removed,) as the 'register' for the mold. I leave the bead in for just a short while (minutes) and remove it as soon as the plaster has hardened enough to keep the round shape that the bead leaves. This indented shape I call the female part of the register. When I make large molds I leave this to dry overnight. This little mold, I will leave for a few hours (and perhaps leave it on a drying rack I set up, which is a rack placed over an electric cup warmer.) When plaster dries it becomes much much lighter in colour and definitely lighter in weight:
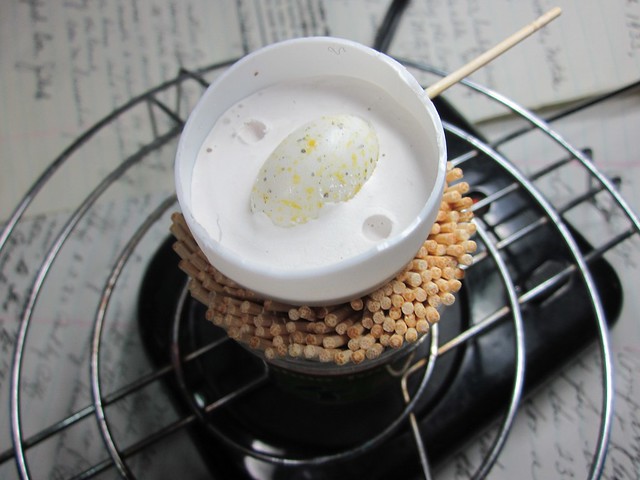
Here the registration 'beads' have been removed and have left a nice female registration indent. The rack is set up and I'll leave it for a few hours. Meanwhile, it is tea time!!
Well, the time has come to pour in the second half of the mold. The plaster has dried, and so to prepare the mold, just coat the plaster that has dried in the mold, with a thin coat of vaseline. This will ensure that the two halves of plaster WON'T stick together. Actually, I give the dried plaster quite a decent coat of vaseline. I give the egg shape that is visible a little extra dab of vaseline as well, for good measure. Mix up a new batch of plaster as before, and pour it into the mold. You want to cover the egg completely. Give the mold a gently shaking back and forth to help bring the air bubbles to the surface and disencourage them to embed in the plaster right against the small egg shape, or just floating freely in the plaster. But I don't mean to split hairs here. Let dry as before:
So the mold has been completely dried and it is time to separate the two pieces. This is the big reveal! TaDa! To do this, remove the plaster mold from the container. In this case, I've used an egg shape piece of plastic for the container and so I'll be able to slice carefully through it, and peel off sections at a time. Oftentimes I use a heavily waxed milk carton and that can be stripped away piece by piece as well. I love using old milk cartons as containers for this reason. Once you have the dried mold free of the container, you will separate the two pieces of plaster to get your two-part mold. You will see where the two pieces of plaster meet. For large molds, I place a flat metal screwdriver end directly at the join and gently whack it with a mallet. I repeat this whacking and sometimes have to give it a really good whack. But for this little mold, I am using the edge of a flat knife and giving it a very very gentle whack with the flat edge of a large bread knife. Twirl the mold around to enter from a different location at the join, and so on, until the mold pieces separate. You might be holding your breath at this stage, and when the mold separates you can take a deep breath!
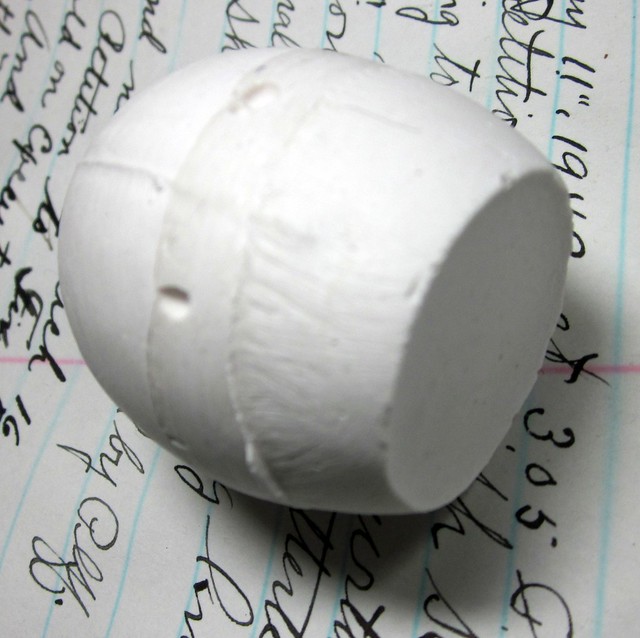

I mostly have a chunk of sculpted plasticine inside the mold for most of this kind of work, and so I would just scoop out the plasticine, chunk by chunk, but here we have plastic. You will have to encourage it out of the mold (whichever half of the mold the small egg shape has decided to stick with) and you will want to be careful not to get wildly energetic about your actions here. If you accidentally gouge into the plaster, it might break, or score scars into the plaster shape. You want virgin plaster if you can keep it. I used an X-acto knife to enter into the small egg shape which is hollow inside and so allows easy access. I did this at an angle and when I pulled up, the small egg popped right out! Now you have two halves of a two-part mold, complete with registration bits. Congratulations. You are half way there!!
*******
With your mold you can now make as many papier mache eggs as your heart desires. Let's get started. For the paper, I use paper towels and for the paste I use flour and water. That's it. You can use ready made glue like 'modpodge' or even wood glue. Tear the paper towel into little flakes. View the picture below to see the general size of paper flakes. Mix up a batch of flour and water paste to the consistency that you like. I sometimes drop in a bit of essential oils to discourage mold or bugs. Bugs and mice love to eat dried papier mache. The essential oils are supposed to prevent this. Who knows? For this project, I decided to try modpodge for the first time. As it is a glue, and sealer, and finishing coat all at the same time, it will likely deter pests. Here is what you do: coat the inside of the mold with a thin layer of vaseline to act as a release Be sure to coat the flange area (rim outside of the egg shape) as well. I use my dedicated vaseline brush for this. With a clean brush (NOT the dedicated vaseline brush,) dip the brush into the paste you've made [flour and water], OR, modpodge as I am doing, and then pick up a flake of paper with the brush, and then apply the flake to the mold by pressing in with the brush. Keep going. Overlap the paper flakes. Aim for about 3-4 'layers' of paper. I've used white paper towels, and paper table napkins in a colour, so that I can see the layers. Make sure that you give a nice 'hinge' overlap all the way around the shape by setting the flakes inside the egg and up over the flange area. Here's a few pictures to give you an idea of what you are doing:
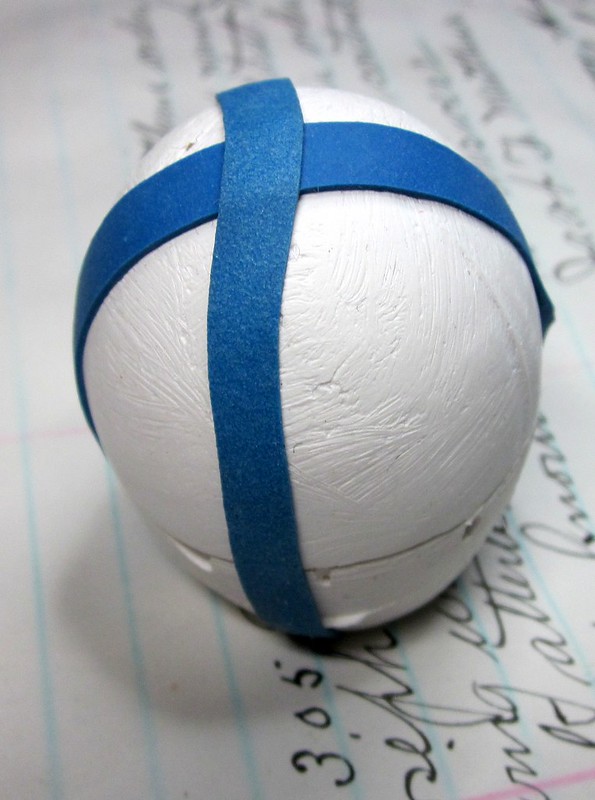
Do the same with the other mold half. Let them dry. They will dry fairly fast as they are small. When you have two mold halves prepped with paper flakes, give the flange area a nice coat of modpodge or paste if that is what you are using, and place the two mold halves together, matching up the registration marks. Press the two halves together well, and secure all around with a strong rubber band. It just needs to dry now. I have mine baking on my rack with the heat from the cup warmer, so they dried fast. I gave them an hour for good measure:
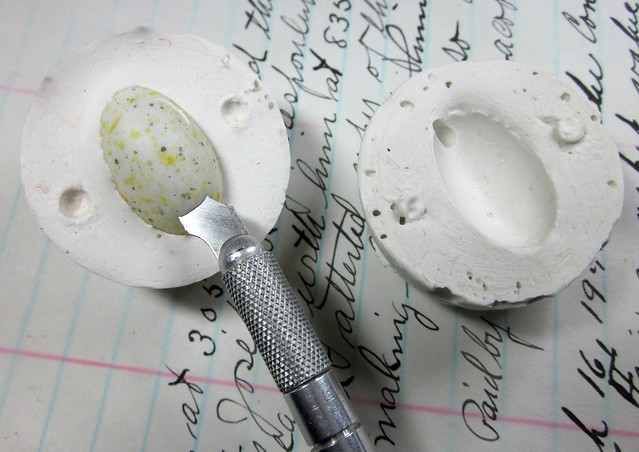
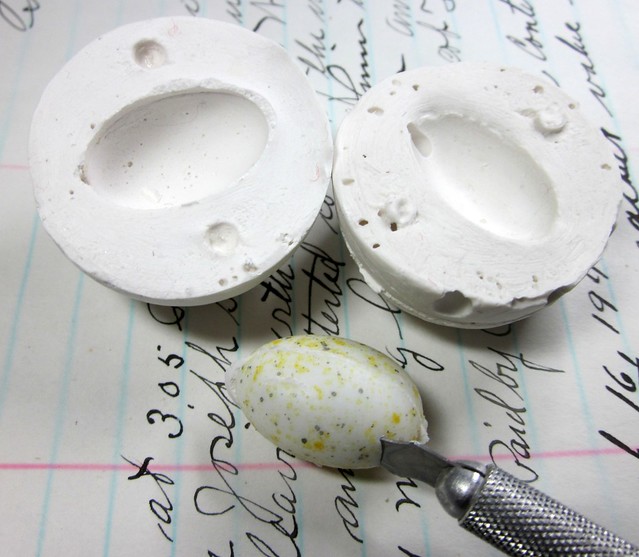
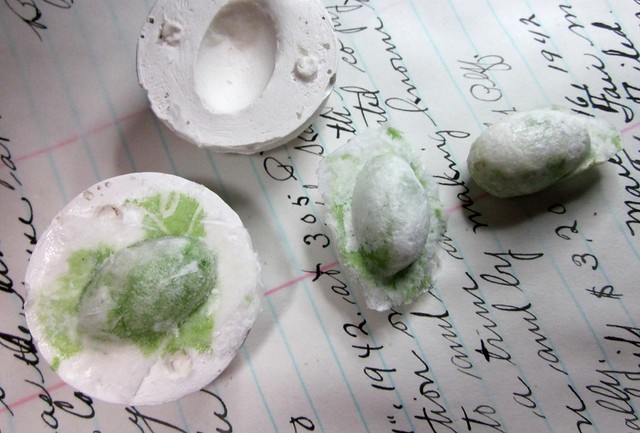
The paper will shrink with drying and will literally pop out of the mold. You can encourage the paper pieces where required. Just pull. Tweezers come in handy here. When the egg comes out of the mold, it will have a flange all of the way around it and you want to remove that and sand it flat and apply more paper flakes for strength. You will do this a section at a time. I am making as flat a join as I can, working on a section at a time. I apply paper flakes to the join, and let it dry. Then move over and cut some more of the flange away, and apply paper flakes and let that dry. Do this until your egg is completely together with no flange left. Here is a photo that shows the egg before it comes out of the mold, and an egg that has come free of the mold, and one I have started to work on by removing a section of flange, a section at a time. It is close to being complete.
You can sand the papier mache. Use the finest grit [I use grit P120] you can find (even wet/dry works well although obviously you won't wet it) and smooth out any obvious bumps. You can just keep adding paper flakes with the paste where you want, and let them dry, and sand, and so on until you are satisfied with the shape. You have just made a papier mache egg. Now you can decorate it! That takes us to the third part!
*******
Decorating your egg is up to you. My plans are to give it a coat of gesso and then a layer of paint application by throwing the paint onto the surface using an old toothbrush. Then I'll apply a coat of clear gesso and then spray it with a coat of matte finishing spray. That is what my plans are for next weekend, as I'll be continuing to work on my papier mache eggs. See you soon, I hope!
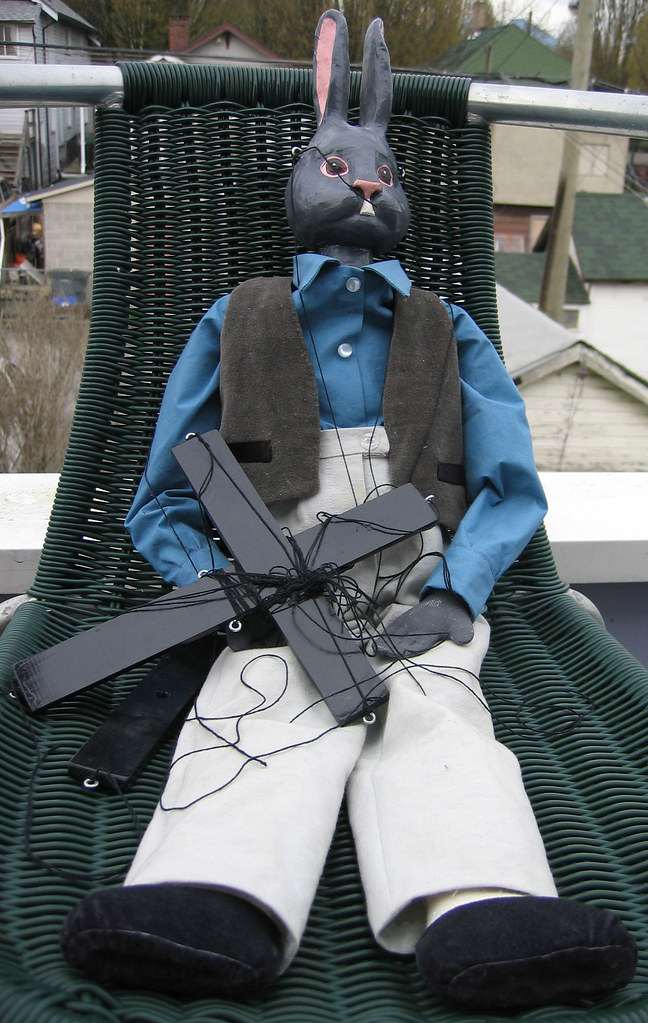
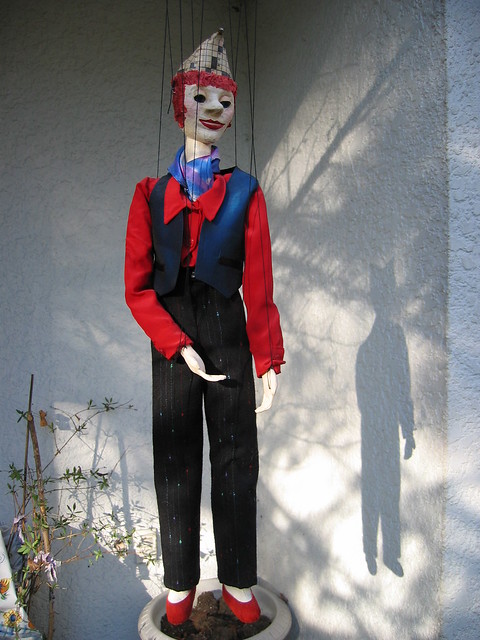
I decided to show you a couple of things I made a few years ago, using this exact procedure of what I have described to you regarding eggs. This fella (a complete working 3 foot high marionette) might just bring you eggs, and the other fella might just steal them. They both have the name Jack. One a jackrabbit and one a trickster.
Yup, count me in, dear Norma!
ReplyDeleteThis is Eggzactly the right challenge theme right before Easter, Norma. Please add me to the players.
ReplyDelete-sus
Oh, dear Norma... I am in, please add me to the list of players!
ReplyDelete:)
Love
Ariane.
lovely theme
ReplyDeletewith Easter so near
i am not sure but i will try
so yes
count me in!
Patrice A.
Now at Easter time i should join in.
ReplyDeleteI'm not sure .. but yes please count me in, i will try..
greetings
Thanks for inviting, I'm in! :)
ReplyDeleteme too, please!
ReplyDeletex Stefanie
and me too, please?
ReplyDeletehave a good week Norma!
me as well please :)
ReplyDeleteI would play, yes?
ReplyDeleteyes please Norma, count me in,x
ReplyDeleteYes please count me in too! Xoxo Barbara
ReplyDeleteHello Norma, I hope it is still soon enough to participate?
ReplyDeleteI would like to be included in this challenge.
thanks,
emily
Hi Norma - It sounds like a fun idea, and I would so like to participate, but unfortunately my plate is full and I am trying not to overload it so I will have to decline this time. (although I have a number of ideas I would like to try!!) Have fun creating 'eggs'!
ReplyDeleteoh yes!
ReplyDeleteegg-egg...!
n♥
oh yes, I'm looking for some eggs! gak, gak, gak...;-) mano
ReplyDeleteDear Norma,
ReplyDeletegreat Easter theme - let me be in
Sabine
If renilde give a heads up, i will come back, and look at the wonderful eggs!
ReplyDeleteThis comment has been removed by the author.
ReplyDeleteI'm making eggs all weekend: paper, wooden and the real thing. I'm in!
ReplyDeleteNORMA! you make this look so easy but I gasped out loud when I read about splitting the mould open! Wow. Your marionettes are adorable. Have they performed?
ReplyDeleteThanks for hosting this week. I had a great time.
xo Carole
norma! excellent result! i'm convinced it all takes more time and effort than how you show it, but your tutorial is great, norma. you held me in suspense until the revelation...this could turn out much more fun than plastering window sills, my dear...great stuff, your two registered halves look so good, so pro! i like them for showing off, yeah! they'd look good on my (tiny) window sills too... hee hee.
ReplyDeletethe bigger projects you show are breath taking! oh, and i'm so looking forward to the continuation of those tiny eggs. they'll become stunning, under your hands.
n♥
happy easter, and super theme, norma!
what a grand tutorial!
ReplyDeleteit looks so easy
but will it be?... ;^))
i loved it
as i loved the theme
but as you can see
i haven't make something myself
just thoughts and an old book
♥
Patrice A.
well Norma, this is super, anyone would be able to make papier maché eggs following your fascinating and clear explanation, anyone with some patience, you make it look exciting and relaxing at the same time and i can't wait to see the further results, i know already they are gonna be soooooo cute,
ReplyDeleteboth your Jacks are beautiful pieces of work, you do have golden hands my dear,
thanks for a lovely post and theme, xx
Hi Norma,
ReplyDeletethanks for these detailed instructions. I have not yet known. This is self made and it looks for many patience and a steady hand.
thanks for showing us
greetings XD
Wow Norma what a whole lot of work and I guess it looks much easier than it is! Wonderful and amazing!
ReplyDeleteHugs Barbara
a super tutorial with a great result, dear norma! the fine green paper maché eggs are fantastic! I'm looking forward to the next weekend!
ReplyDelete:)) mano
ps: thank you so much for your lovely comment!!
Thank you for teaching me something new! Great tutorial and great results. It looks so easy on the pics, but I bet it takes some time and patience.
ReplyDeleteBest wishes!
What an extensive and intricate endeavor..the paper mache eggs are whimsical. Love the touch of green. You went through a lot of effort on this post with instructions and images and sharing. THANK YOU!
ReplyDeleteMmmmm! Great and informative post, Norma. Thank you for sharing this interesting process in detail. I really enjoy your writing style, which always hands me a smile.
ReplyDeleteHappy Easter, (and sorry to be late posting my egg but it is done now)! xxoo, sus
hi, Norma, thanks for the invitation, I had fun doing my part.
ReplyDeletedo you know that long ago, I did ceramic souvenirs, and I produced dozens of molds to be filled with liquid mud, with the same system as you explain here,
OK. thank you for your visit and your comment. you are very kind!
good week for you, was a pleasure to participate :)
I would have loved to participate in this challenge but there was not time after traveling south to check on aging parents. But the responses to the challenge are so much fun to wander through and this process of yours was impressive!
ReplyDeleteEggs!!
ReplyDeleteLove it :]
Oh Norma what a great tutorial!!! Thank you for sharing. The eggs are looking wonderful, but I do hope you will show them when they are finished! And your marionettes!!!! outstanding! (I also loved seeing my little creations beside your egg bowl!
ReplyDelete